March 2012
Tom Knezic
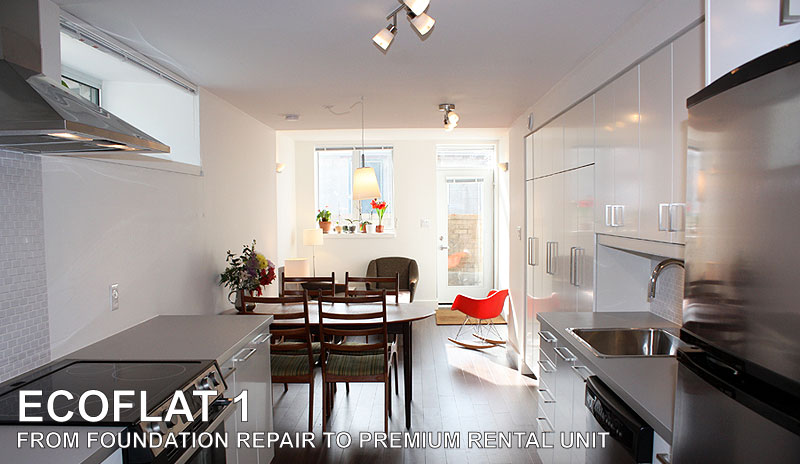
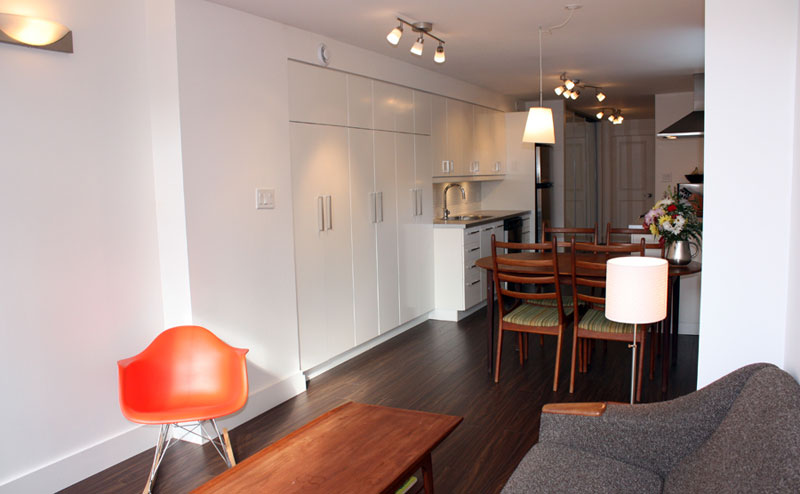
This new 600sf bachelor suite is the first apartment unit to follow the Solares Environmentally Integrated Home methodology. It was part of a larger project that secured the foundations of a 120 year old mixed used building in Toronto. With its' own entry, south facing windows, tall ceilings and heated floors it is hard to believe that this unit is in a basement. The space is dry, warm and air tight thanks to an internal drainage system and a blanket of foam insulation. The windows and doors are fiber glass framed, double glazed and provide abundant natural light. A tankless high efficiency boiler supplies domestic hot water for the whole building and infloor heating for this apartment and the office above. A heat recovery ventilator exchanges air without wasting heat energy. The affordable and durable finishes have low VOC and formaldehyde content, minimizing off-gassing. This comfortable, clean and attractive space will make for a premium rental unit.
For more pictures of the final product click here.
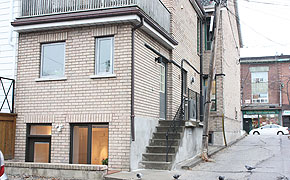
You may have guessed already that this apartment is below our home and office. During the course of the project we filled the role of architect, construction manager and even site labourers. Due to a host of existing conditions, such as crumbling foundations, inadequate drains, fire ratings and occupied neighbouring units, it was among the most difficult projects that we have dealt with. For those that are interested in the details, I have compiled a graphic description of the construction process below.
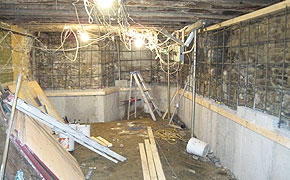
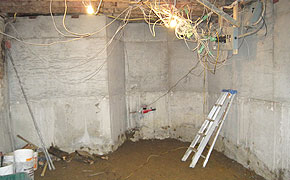
When we bought the building there was an unoccupied and illegal apartment in the basement. Since the apartment was less than appealing, we decided to strip all the finishes to see what was behind the walls. Once we had started we just decided to keep going, so soon enough we had removed everything from the unit, including the concrete slab.
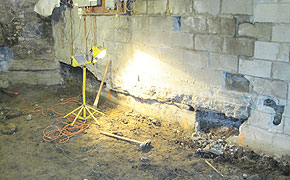
At that point we found some peculiar voids below the foundation walls, where the footings should have been. We discovered that a previous owner had dug out the basement, below the footing level. This left the footing sitting on a ledge of soil, which quickly began to crumble due to the weight and groundwater action. As a result parts of the building had sunk significantly and were still sinking. This handy work was hidden behind a layer of face block so it was not apparent until after some intensive explorations using a long drill-bit.
After some anxiety, we worked out a solution with our structural engineer. First, we underpinned the foundations with reinforced concrete. This involved digging 3' holes under the foundations every 12'. Steel reinforcing was put inside the hole then covered with a form and filled with concrete. Our concrete sub-contractor did this four times, which resulted in a completely footings for the entire building. It was a real relief to see the building supported on a new 3' high and 3' thick concrete footing. An added benefit was that we could lower our floor level substantially, giving us much higher ceilings.
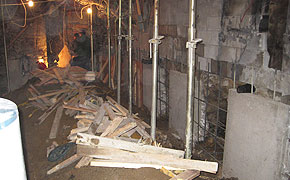
The second problem was that the rubble walls were in poor condition and crumbling. To further complicate things, half of the east foundation wall is directly on a laneway, so it had to support the weight of passing vehicles, some of them trucks. This vehicle "surcharging" was bowing the already weak wall inward. The repair solution was to cast a new 8" thick new concrete wall directly in-front of the rubble foundation wall and connect it to the floor system with steel brackets. That wall was completed in a single concrete pour and it made the basement almost feel like new.
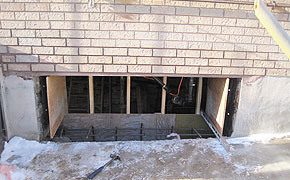
While we were at it, we cut a new window into the side of the building, increased the size of several window openings and removed a bearing wall. This created a single open space and brought ample natural light into the unit. All of these moves relied on steel beams to support the existing masonry walls.
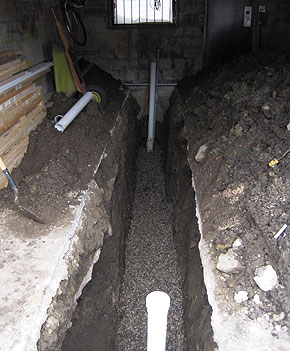
Following that we reorganized the wiring, which was like unravelling a very large knot. For good measure we put a new panel in the basement and one in the office above. We then ran into a problem with the drains because we could not achieve the slope that was required by our building inspector, who made us roll a pool ball through the drain. Since a substantial slope is required to do this, we had to lower all the drains by about 16". Unfortunately our garage was in the way so we had to cut through the floor slab it to attach to the sewer line. While this was a very costly and labour intensive exercise, it allowed us to run all new drains for the building and run electrical and water service to the garage.
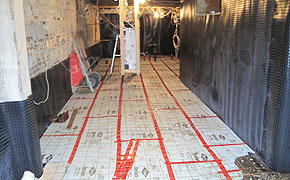
After the drains, things moved along at a slightly faster pace. A drainage layer was fixed to the inside face of the foundation walls and draped over a weeping tile around the perimeter of the walls. Any water that penetrated the foundation wall would thereby be taken to a sump pit where it would be pumped out into our front garden. A layer of gravel was laid on the ground, creating an additional drainage layer, and then a layer of foam placed on top of that. Steel mesh was arrayed on top of the insulation and infloor heating tubes were tied to it. Finally a concrete slab was poured on top of this assembly. We breathed a sigh of relief to be out of the mud.
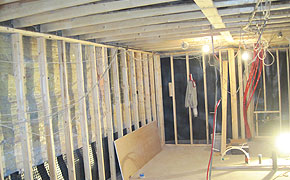
Once the slab was in place we could start the framing, which proved to be more complicated than we anticipated. Due to the sinking foundations the floor above was about 6" out of level on a 14' span. So to get a level ceiling, 2x6 members were nailed to the side of every joist. We then ran all the wiring, plumbing and data/voicelines through the framing.
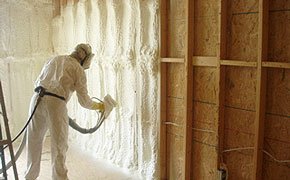
Finally we were able to insulate, and we chose to use a 3" layer of closed cell spray foam (somehow I didn’t get a photo of this- the one below I found online). Around the perimeters, the partition walls were framed with a 1" gap between the back of the stud and the waterproofing membrane to allow a continuous layer of insulation. It also filled the particularly deep joist ends and other nooks and crannies in the construction. This type of insulation is very useful in renovations where it is difficult to waterproof and air seal in a conventional manner. We used a new type of closed cell foam that is water based and has significantly less global warming potential than polyurethane.
Like other parts of the project, drywall also proved to be more complicated than we expected. Due to the mixed commercial nature and height of the building, the ceiling of the apartment, as well as the wall of the mechanical/storage room, had to have a 1 hour fire rating. In the case of the ceiling, this involved filling the joist space with a fire resistant insulation, strapping it out with a metal channel, and then applying 2 layers of 5/8" fire rated drywall. To make matters worse, the ducts and wires that passed through this separation, had to be fire protected by a myriad of solutions. The upside of this work beyond the fire-protection, was significant sound isolation between the two units.
The finishes chosen were "cheap and cheerful" as we say in the business. All the fixtures and products were readily available and standard sizes. To minimise off-gassing we used paint with Low VOC (volatile organic compounds) content, and cabinetry with no added formaldehyde. Laminate flooring was chosen for its affordability, durability and ability to transmit heat.
When we finally finished the work we decided to put it to the test and move in! Christine, Hamish and I are living in this suite while we do some minor renovations to our apartment above the office. So far we like the apartment and would probably stay if there was a little more space. While the construction process was difficult, we learned a great deal, and living in the final product has proved very rewarding. We've already thought of several improvements that we can make to the next generation ECOFlats. |